192.168.1.1
Router Admin Login Guide
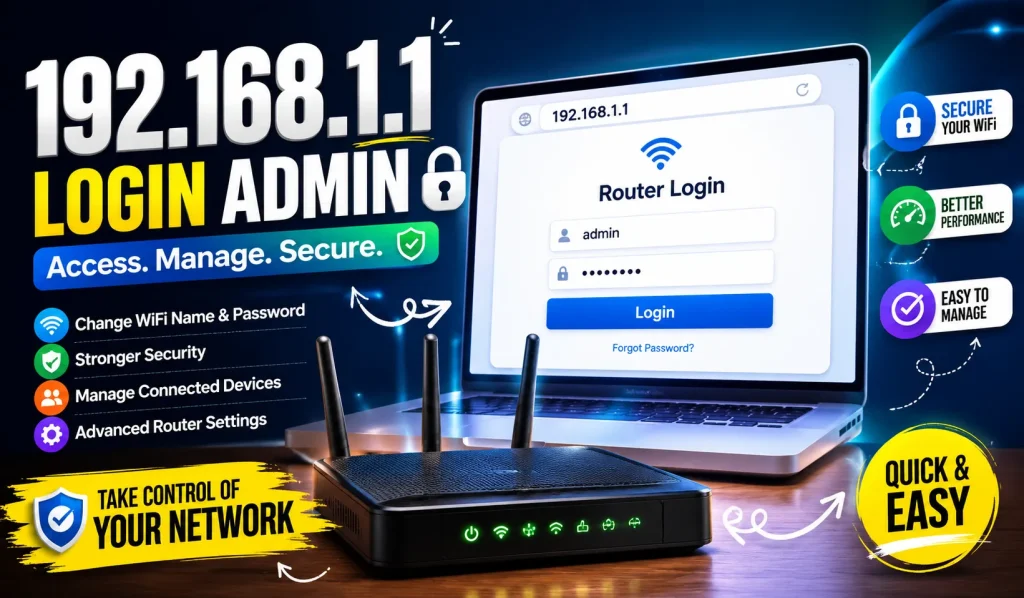
192.168.1.1 is the address your router uses to let you in through the back door. Type it into any browser, and you land on your router’s admin panel — the control room for your entire home network. From here, you can log in, change your WiFi password, rename your network, block unwanted devices, and adjust security settings without calling your internet provider.
What is 192.168.1.1 Login?
192.168.1.1 login is simply the process of accessing your router’s admin panel using this IP address as the entry point. You open your browser, type 192.168.1.1 in the address bar, and a login page appears asking for a username and password.
Once you are in, you can change your WiFi name, update your password, control which devices connect, and configure security settings. Most routers come with a default username and password printed on the back label. This login page is where all the real control lives — and knowing how to use it properly makes managing your internet connection surprisingly simple.
How to Login to 192.168.1.1
Logging into 192.168.1.1 is easier than most people think. Just follow these five simple steps and you will be inside your router’s admin panel within seconds.
Connect to Your Router
Make sure your device is connected to your router either through WiFi or an ethernet cable before you begin.
Open Your Browser
Open any browser you prefer — Chrome, Firefox, or Safari — and click on the address bar at the top.
Type the IP Address
Carefully type 192.168.1.1 in the address bar. Do not Google it — type it directly to avoid wrong websites.
Enter Your Login Details
A login page will appear. Enter your router’s username and password. Most routers use “admin” for both fields by default.
Access Your Admin Panel
Click login and you are in. Now you can change WiFi password, rename your network, or adjust any security settings freely.
Never share your router login credentials with anyone. Change the default password immediately after your first login to protect your network from unauthorized access.
If the login page does not open, try using http://192.168.1.1 with “http” included. Some browsers block it without the prefix.
Browser address bar
http://192.168.1.1
Type this exactly — no spaces, numbers only.
Default Username and Password List
Most routers come with factory login details. If you never changed them, find your brand below. Always change these after first login.
Important: Change your default password immediately after logging in. Default credentials are publicly known and leave your network vulnerable.
1
Check the router label or box for default login details.
2
Visit 192.168.1.1 in your browser.
3
Enter the listed username and password.
4
Change the default password immediately.
|
Router Brand |
Default IP |
Username |
Password |
|---|---|---|---|
|
admin |
admin |
||
|
D-Link |
admin |
admin / blank |
|
|
Netgear |
admin |
password |
|
|
ASUS |
admin |
admin |
|
|
Linksys |
admin |
admin |
|
|
Globe (PH) |
admin |
user |
|
|
PLDT (PH) |
admin |
user |
How to Change Your Router’s IP Address
Changing your router’s IP address helps avoid conflicts, organize networks, and improve control. Select your router brand below:
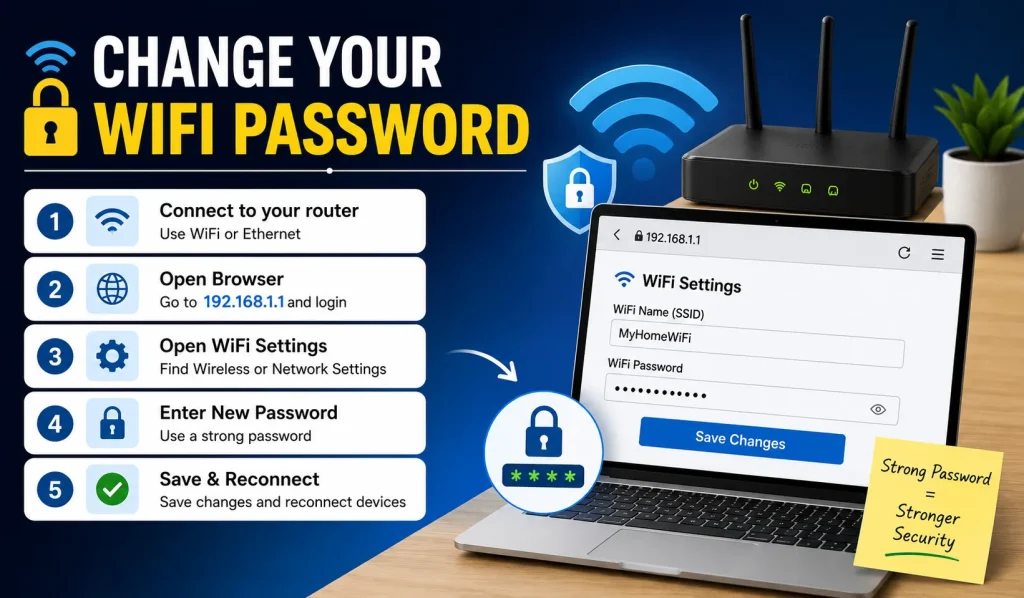
How to Change Your WiFi Password
Changing your WiFi password helps protect your network from unauthorized access and improves overall security. Most routers allow you to update the password through the router login page. By accessing 192.168.1.1, a common private IP address used for router management, you can open the admin panel, adjust WiFi settings, and manage important network configuration options.
How to Change Your WiFi Network Name (SSID)
Changing your WiFi network name, also known as the SSID, makes it easier to identify your network and improve organization. Most users change the default name after accessing the router login page. Many routers use 192.168.1.1, a private IP address that opens the admin panel where you can manage WiFi settings, password management options, and other network configuration features.
Common 192.168.1.1 Login Problems and Solutions
While accessing the router admin panel, users may sometimes face login or connection issues. Since 192.168.1.1 is commonly used for router login, even a small mistake can prevent access to WiFi settings, password management, and network configuration options.
Login Page Not Opening
If the login page does not load, make sure your device is connected to the router. Check the address carefully, restart the router, and try opening the page using a different browser.
Incorrect IP Address
Many users mistakenly enter the wrong address such as 192.168.l.l or 192.168.11. Verify your router’s default gateway and enter the correct IP address shown in network settings.
Wrong Username or Password
If the login details are rejected, check the router label for default credentials. If previously changed, use the updated information or reset the router to factory settings.
Firewall Blocking Access
Security software or firewall settings may block local network communication. Temporarily disable the firewall for testing purposes and check whether the login page becomes accessible.
Forgotten Admin Password
When the administrator password is completely forgotten, perform a factory reset using the reset button. After restarting, log in using the router’s default credentials.
How to Update Router Firmware
Updating your router firmware helps improve security, fix bugs, and enhance network performance. Most routers allow firmware updates through the router login page. Many users access this page using 192.168.1.1, a private IP address that opens the admin panel for WiFi settings, password management, and network configuration.
- Connect your device directly to the router using a stable WiFi connection or Ethernet cable for reliability.
- Open a web browser, enter 192.168.1.1, and log in using your router administrator username and password.
- Navigate to the Firmware Update, System Tools, or Administration section within your router settings menu.
- Check for available updates or upload the latest firmware file downloaded from the router manufacturer’s website.
- Start the update process and wait patiently until completion, avoiding power interruptions or router restarts.
How to Set Up Parental Controls
Parental controls help you manage internet access and create a safer online environment for children. Most routers include built-in parental control features that can be configured through the router login page. Many users access these settings through 192.168.1.1, a private IP address used to manage WiFi settings, password management, and network configuration.
- Connect your device to the router network and ensure you have administrator access to modify router settings.
- Open a browser, enter 192.168.1.1, and sign in using the router’s administrator username and password.
- Locate the Parental Controls, Access Control, or Family Protection section within the router settings menu.
- Select the devices you want to manage and configure website restrictions, content filters, or internet schedules.
- Save your settings and test the restrictions to confirm parental controls are working as expected.